
Marble Rye Bread
Hey there, bread lovers! Have you ever stared at that gorgeous marble rye bread at your local bakery and wondered if you could create those hypnotic swirls in your own kitchen? I sure did, and let me tell you, it was quite the journey getting there. About five years ago, I became obsessed with perfecting marble rye bread after tasting an incredible sandwich at a small deli in Boston. The way those dark and light swirls complemented each other wasn’t just beautiful—it was a flavor revelation that sent me down a rabbit hole of rye flour experiments and dough-twisting techniques.
So grab your aprons and clear your countertops, because I’m about to share everything I’ve learned about making this stunning loaf at home. And trust me, once you master marble rye bread, your sandwich game will never be the same!
Recipe Snapshot
- Prep Time: 25 minutes (plus 2 hours rising time)
- Cook Time: 35 minutes
- Total Time: 3 hours
- Servings: 1 large loaf (about 12 slices)
- Calories: 165 per slice
- Difficulty Level: Intermediate
Why You’ll Love This Marble Rye Bread Recipe
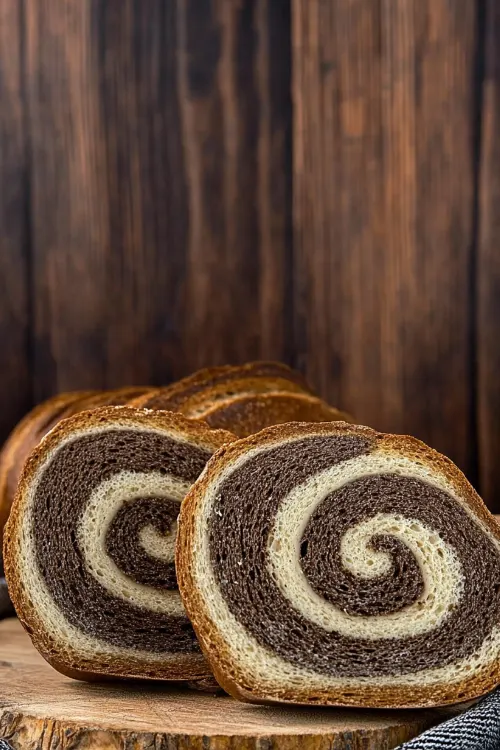
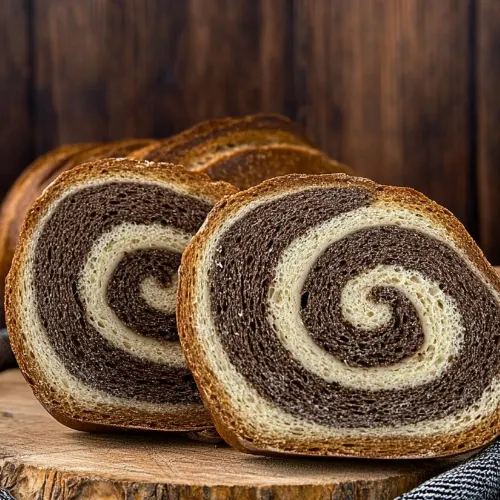
There’s something almost magical about slicing into a loaf of homemade marble rye bread and revealing those perfect swirls inside. I remember the first time I tried making it—what a disaster! I didn’t layer the doughs properly, and instead of beautiful swirls, I ended up with what looked like a weird bread Rorschach test. My husband still teases me about it, calling it my “abstract expressionist bread phase.”
But that’s the beauty of this recipe—even when you mess it up, it still tastes amazing. And honestly, there’s a certain satisfaction that comes from mastering those swirls. The contrast between the light rye and the darker, more robust pumpernickel-style dough isn’t just visually stunning—it creates this perfect flavor balance that store-bought marble rye bread just can’t match.
What makes this recipe special is how it combines two distinct personalities in one loaf. The light rye has this subtle tanginess that’s super approachable, while the dark rye brings a deeper, more complex flavor profile. Together? They’re basically the power couple of the bread world.
And can we talk about the smell while this is baking? It’s enough to make everyone in the house suddenly appear in the kitchen asking when it’ll be ready. There’s something about the aroma of caraway seeds and molasses that feels both nostalgic and exciting at the same time.
Plus, this marble rye bread is actually easier to make than it looks. Sure, you’re technically making two doughs, but they’re nearly identical except for a few flavor additions. Think of it as the bread equivalent of getting two for the price of one with just a little extra effort. And believe me, when you serve a sandwich on this, people will think you’ve become some kind of artisan baker overnight!

Ingredients You’ll Need
For the Light Rye Dough:
- 1½ cups all-purpose flour
- 1 cup rye flour (I use medium rye, but light works too)
- 2 tbsp caraway seeds (feel free to reduce if you’re not a huge caraway fan)
- 2 tsp salt (I prefer kosher salt here, but table salt works in a pinch)
- 1 tbsp sugar
- 2 tsp instant yeast (or active dry, but you’ll need to activate it first)
- 2 tbsp vegetable oil (or melted butter if you’re feeling fancy)
- 1 cup warm water (around 110°F—I usually just test it on my wrist)
For the Dark Rye Dough:
- 1½ cups all-purpose flour
- 1 cup rye flour
- 2 tbsp caraway seeds
- 2 tsp salt
- 1 tbsp sugar
- 2 tsp instant yeast
- 2 tbsp vegetable oil
- 1 cup warm water
- 2 tbsp molasses (I get mine from Trader Joe’s, but any unsulphured molasses works)
- 1 tbsp unsweetened cocoa powder (Dutch-processed gives a deeper color)
- 1 tbsp instant coffee (optional, but it deepens the flavor without tasting like coffee)
For the Topping:
- 1 egg white, lightly beaten
- Extra caraway seeds for sprinkling (completely optional, I sometimes skip this)
I usually get my rye flour from Bob’s Red Mill—it’s pretty reliable and available at most grocery stores near me. If you can’t find it locally, King Arthur also makes a good one that you can order online. And honestly, don’t stress too much about having the “perfect” rye flour. I’ve made this recipe with whatever I could find at the store and it always turns out great.
One thing I’ve learned the hard way: check your yeast expiration date! Nothing’s more frustrating than wondering why your dough isn’t rising only to discover your yeast expired six months ago (yep, been there).

Step-by-Step Instructions
Making the Two Doughs
- Prep your workspace. Start by clearing off a good amount of counter space—you’ll be dealing with two doughs, so you’ll need the room. I like to set up two mixing bowls side by side so I don’t get confused about which is which. Trust me, after accidentally adding molasses to both doughs once, I’ve learned to be a bit more organized!
- Mix the dry ingredients for both doughs separately. For the light rye, combine the all-purpose flour, rye flour, caraway seeds, salt, sugar, and yeast in one bowl. For the dark rye, combine the same dry ingredients in a separate bowl, plus the cocoa powder and instant coffee if using. Give each bowl a good whisk to distribute everything evenly. I usually give the dark bowl an extra whisk because the cocoa tends to clump.
- Add the wet ingredients to each bowl. For the light dough, add the oil and warm water. For the dark dough, add the oil, warm water, and molasses. The molasses can be a bit stubborn sometimes—I warm it slightly in the microwave (like 10 seconds) to make it easier to pour.
- Mix and knead the doughs. Stir each mixture until a shaggy dough forms, then turn them out onto lightly floured surfaces. Knead each dough separately for about 8-10 minutes until smooth and elastic. The dark dough will be slightly stickier because of the molasses—that’s normal. Just resist the urge to add too much flour or your bread will be dense.
- First rise. Place each dough in a lightly oiled bowl, cover with plastic wrap or a damp kitchen towel, and let rise in a warm spot for about 1 hour, or until doubled in size. I put mine on top of the refrigerator in winter or just on the counter in summer. If your kitchen is cold, you can turn your oven on for just a minute, then turn it off and use it as a proofing box.
Creating the Marble Effect
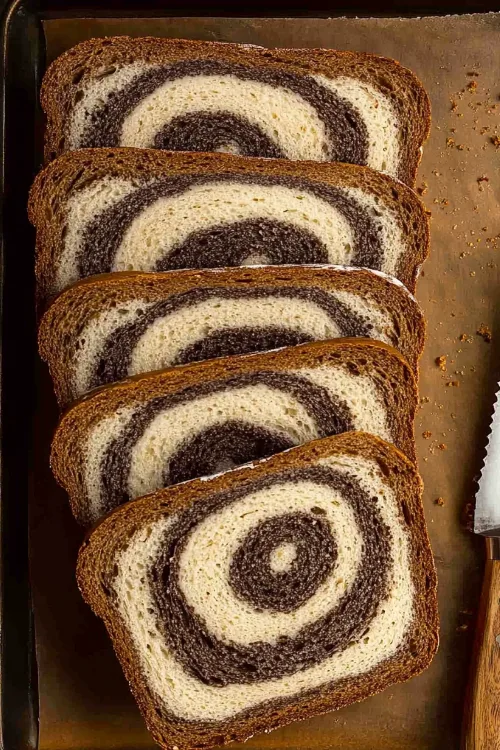
- Punch down and shape. After the first rise, gently punch down both doughs to release air bubbles. Now comes the fun part! Turn both doughs out onto a lightly floured surface. I like to pat each dough into a rectangle about the same size—roughly 8×12 inches.
- Create layers. Cut each rectangle into 6 strips. Now, alternate the strips, placing a dark strip next to a light strip, and so on. You’ll have a striped rectangle of dough. Don’t worry if they’re not perfect—mine rarely are!
- Stack and roll. Carefully stack the strips on top of each other to create a little dough tower. Then, starting from one of the short ends, roll the stack into a log. This is where the magic happens! As you roll, the layers will create those gorgeous swirls. The first time I did this, I was so nervous I’d mess it up that I rolled it super tight—don’t do that! Keep it relatively loose for a lighter texture.
- Shape the loaf. Place the log seam-side down on a parchment-lined baking sheet. If you prefer a round loaf, curl the log into a spiral. For a sandwich loaf, gently place it in a greased 9×5 inch loaf pan. I personally prefer the loaf pan because it gives those nice even slices for sandwiches.
- Second rise. Cover the shaped loaf loosely and let it rise again for about 45 minutes, or until it’s puffy and expanded. This second rise is crucial for a light texture, so don’t rush it!
- Preheat and prep for baking. While the loaf is on its second rise, preheat your oven to 375°F. Just before baking, brush the top of the loaf with beaten egg white and sprinkle with additional caraway seeds if desired.
- Bake. Slide that beautiful creation into the oven and bake for 30-35 minutes, until the crust is golden brown and the loaf sounds hollow when tapped on the bottom. If you’re using a loaf pan, it might need an extra 5 minutes—I usually check by inserting a thermometer into the center; it should read around 190°F.
- Cool properly. This is probably the hardest part—waiting! Transfer the bread to a wire rack and let it cool for at least an hour before slicing. I know it’s tempting to cut into it right away (the smell is torture!), but if you slice it while it’s hot, the texture will be gummy. Ask me how I know…
Variations & Storage Tips
So you’ve mastered the basic marble rye bread recipe—awesome! But why stop there? Over the years, I’ve played around with this recipe quite a bit, and here are some of my favorite variations:
Seeded Marble Rye: Besides caraway, try adding a tablespoon of dill seeds to the light dough and a tablespoon of fennel seeds to the dark dough. My friend Mark tried this at his dinner party last month and said it was a total hit.
Sourdough Marble Rye: If you’ve got a sourdough starter hanging out in your fridge, reduce the yeast to 1 teaspoon in each dough and add 1/2 cup of active starter to each. You’ll need to extend the rise times, but the tangy flavor is SO worth it.
Onion Marble Rye: Add 1/4 cup of dried minced onion to the light dough. This makes an incredible base for a Reuben sandwich. Just be prepared for your kitchen to smell like onions for a bit!
“Marble Rye Rolls”: Instead of making one big loaf, divide each dough into 8 pieces, twist a dark piece with a light piece, and shape into dinner rolls. They bake faster (about 20-25 minutes) and are perfect for holiday dinners.
As for storage, marble rye bread stays fresh at room temperature in a paper bag or bread box for about 2 days. After that, it starts to get a bit stale. Trust me—I once forgot about half a loaf in my bread box for a week, and it was like trying to eat cardboard!
For longer storage, I slice the whole loaf once it’s completely cool, then freeze it in a ziplock bag. That way, I can grab just a slice or two as needed. It thaws quickly at room temperature or can go straight into the toaster from frozen.
And here’s a little secret: slightly stale marble rye makes THE BEST French toast you’ve ever had. The caraway seeds give it this unexpected savory note that pairs amazingly with maple syrup. We discovered this by accident one Sunday morning when we had nothing else for breakfast, and now it’s a regular weekend treat!
Marble Rye Bread
Equipment
- Mixing bowls
- Whisk
- Rolling Pin
- Baking sheet or loaf pan
- Parchment paper
- Oven
Ingredients
For the Light Rye Dough:
- 1½ cups all-purpose flour
- 1 cup rye flour
- 2 tbsp caraway seeds
- 2 tsp salt
- 1 tbsp sugar
- 2 tsp instant yeast
- 2 tbsp vegetable oil
- 1 cup warm water
For the Dark Rye Dough:
- 1½ cups all-purpose flour
- 1 cup rye flour
- 2 tbsp caraway seeds
- 2 tsp salt
- 1 tbsp sugar
- 2 tsp instant yeast
- 2 tbsp vegetable oil
- 1 cup warm water
- 2 tbsp molasses
- 1 tbsp unsweetened cocoa powder
- 1 tbsp instant coffee optional
For the Topping:
- 1 egg white lightly beaten
- Extra caraway seeds optional
Instructions
- Prepare the Doughs: In separate bowls, mix the dry ingredients for both the light and dark rye doughs. Add wet ingredients and knead until doughs are smooth and elastic.
- First Rise: Let both doughs rise in oiled bowls for about 1 hour, until doubled in size.
- Shape the Doughs: Punch down the doughs and roll them out into 8×12-inch rectangles.
- Create the Marble Effect: Cut each dough into 6 strips and alternate them to form a striped rectangle. Stack and roll the dough into a log, shaping it into a loaf.
- Second Rise: Let the loaf rise for 45 minutes.
- Preheat and Bake: Preheat the oven to 375°F, brush the loaf with egg white, and bake for 30-35 minutes.
- Cool: Let the loaf cool on a wire rack for at least 1 hour before slicing.
Notes
Nutrition
Frequently Asked Questions
What is the difference between rye bread and marble rye bread?
So, traditional rye bread is made with just one type of dough that contains rye flour, which gives it that distinct flavor. Marble rye bread, on the other hand, combines two doughs—a light rye and a dark rye—twisted together to create that beautiful swirled pattern. It’s basically a two-for-one deal! The light dough is milder in flavor, while the dark dough (which contains molasses and sometimes cocoa powder) has a deeper, more robust taste. I actually prefer marble rye because you get the best of both worlds in each bite.
Is marble rye a healthy bread?
Well, compared to many white breads, marble rye bread has some definite health advantages. Rye contains more fiber than wheat flour, which is great for digestion. It also tends to have a lower glycemic index, meaning it won’t spike your blood sugar as quickly. That said, it’s not a “health food” in the strict sense—it still contains carbs and calories like any bread. But if you’re choosing between breads, rye (including marble rye) is generally considered one of the more nutritious options. I think of it as a reasonable indulgence!
What does marble rye taste like?
Honestly, marble rye has this complex flavor that’s hard to describe! The light rye portion has a mild, slightly tangy taste with that distinctive caraway seed flavor (those are the little seeds you see that some people mistake for fennel). The dark rye sections have a deeper, slightly sweeter and more robust flavor from the molasses and sometimes cocoa powder (which doesn’t make it taste like chocolate, just adds depth). Together, they create this perfect balance that’s more interesting than plain white bread but not as intense as pumpernickel. It’s particularly amazing toasted, when the caraway seeds become more aromatic.
Can diabetics eat marble rye bread?
This is actually something I’ve researched because my dad is diabetic. Generally speaking, rye bread (including marble rye) tends to have a lower glycemic index than white bread, which means it causes a slower rise in blood sugar. That can make it a better option for people with diabetes compared to white bread. However—and this is important—every person’s response to foods is different, and the marble rye you make at home might have different properties than store-bought varieties. My dad checks his blood sugar after trying new foods to see how they affect him personally. Anyone with diabetes should definitely consult with their healthcare provider about specific foods in their diet.
What is the healthiest bread for diabetics?
From what I’ve learned (again, through research for my dad), breads made with whole grains and minimal processing tend to be the best choices for people with diabetes. 100% whole grain breads, sourdough, pumpernickel, and rye (including marble rye) generally rank better on the glycemic index scale than white or “wheat” bread. Some people with diabetes also do well with breads that contain seeds and nuts, which slow down digestion even further. There are also specialized “diabetes-friendly” breads on the market that are formulated with alternate flours and added fiber. But again, I’m not a healthcare professional, and what works best really varies from person to person.
The Last Slice
There you have it—everything you need to know about making spectacular marble rye bread at home! I still remember serving this at a family gathering last Thanksgiving, and my uncle (who’s usually pretty quiet) couldn’t stop talking about how he’d never had homemade marble rye before. He even asked for the recipe, which from him is basically the highest form of compliment possible.
What I love most about this marble rye bread recipe is how it combines simplicity and impression. Yes, there are a few steps involved, but none of them are particularly difficult. And yet the result looks like something you’d see in a fancy bakery window! Plus, there’s something deeply satisfying about slicing into a loaf you made yourself and seeing those beautiful swirls inside.
So give it a try, play around with the variations, and don’t worry if your first attempt isn’t perfect—mine certainly wasn’t! And hey, I’d love to hear how yours turns out. Did you try any interesting variations? What did you serve it with? Drop a comment below and let me know. Happy baking!