
Chocolate Covered Potato Chips
Hey there! Do you ever get those weird cravings where you want something sweet AND salty at the same time? Well, I’ve got the perfect solution that’ll hit both those taste buds at once – chocolate covered potato chips. I first tried making these about five years ago when my kids were having a sleepover, and I was desperately trying to find a snack that would impress a bunch of picky tweens. Let me tell you, these chocolate covered potato chips were an absolute hit! And the best part? They’re ridiculously easy to make (seriously, like almost impossible to mess up). So grab your favorite chips and let’s get this sweet and salty party started!
Recipe Snapshot
- Prep Time: 15 minutes
- Cook Time: 10 minutes (for cooling/setting)
- Total Time: 25 minutes
- Servings: 6
- Calories: 320 per serving
- Difficulty Level: BEGINNER
Why You’ll Love This Recipe
So why should you even bother making chocolate covered potato chips when you could just, I don’t know, eat chips and chocolate separately? Well, let me tell ya – there’s something weirdly magical that happens when chocolate melts over the crispy, salty surface of a potato chip. The contrasting flavors create this flavor explosion that’s honestly addictive.
I remember the first time I tried making chocolate covered potato chips – I accidentally bought unsalted chips (who even eats those??) and the whole batch was just… meh. Trust me, you NEED that salt to balance out the sweetness of the chocolate. Otherwise, it’s like watching a movie with no soundtrack – something crucial is just missing.
The texture is another reason you’ll fall in love with chocolate covered potato chips. That perfect CRUNCH when you bite into them, followed by the smooth creaminess of the chocolate – it’s a textural dream. And honestly? They look pretty darn impressive considering how little effort they take. I’ve brought these to potlucks and people acted like I’d spent hours in the kitchen. (I didn’t correct them, obviously!)
But the real kicker? You can customize these bad boys a million different ways. White chocolate with crushed candy canes during the holidays? Amazing. Dark chocolate with a sprinkle of sea salt for you fancy folks? Incredible. Milk chocolate with a drizzle of caramel? Now we’re talking! The possibilities are endless, which means you’ll never get bored making chocolate covered potato chips.
Ingredients Section
Alright, here’s what you’ll need to make these amazing chocolate covered potato chips:
- 1 bag (8 oz) of ridged potato chips (I personally love using Ruffles – they hold up better to the chocolate. Lays chocolate covered potato chips are amazing too, but they’re a bit more delicate)
- 2 cups of chocolate chips (Semi-sweet works great, but use what you like! And yes, you can use chocolate chips as melting chocolate for dipping)
- 1 tablespoon of vegetable shortening or coconut oil (helps make the chocolate smoother and prevents that weird white film that sometimes forms)
- Optional toppings: crushed nuts, sea salt, sprinkles, crushed candy, etc.
So about those chips – you really want ones that are sturdy. Those paper-thin ones? They’ll break the second you try to dip ’em. Been there, done that, ended up with a bowl of chocolate-covered potato chip crumbs (which, honestly, I still ate with a spoon because I’m not wasteful).
For the chocolate, I usually grab whatever’s on sale at Trader Joe’s. Their chocolate chunks are pretty good quality for the price. But seriously, even the store brand chips work fine. Just don’t use those candy melts – they taste like sweet plastic. And should you add oil to chocolate chips for melting? Absolutely! That tablespoon of shortening or coconut oil makes ALL the difference in getting that smooth, dippable consistency.
If you’re feeling fancy, grab some white chocolate too, and do a little drizzle over the top. Makes ’em look like you’re some kind of professional dessert chef rather than someone who just discovered that dipping one food into another food creates something amazing.

Step-by-Step Instructions
Okay, let’s get down to business and make some chocolate covered potato chips!
Step 1: Prep Your Workspace
First things first, you need to clear some counter space and line a couple of baking sheets with parchment paper. Trust me on the parchment paper – I once used aluminum foil and spent what felt like hours picking tiny bits of foil off the backs of my chocolate covered potato. Not fun, and definitely not safe for your teeth!
Step 2: Sort Your Chips
This might sound silly, but take a minute to look through your chips and pick out the whole, unbroken ones. Set aside any that are broken or crumbly – those are your “chef’s snacks” (aka what you munch on while making the rest). For chocolate covered potato chips, bigger is usually better since they’re easier to handle.
Step 3: Melt That Chocolate
Grab a microwave-safe bowl and toss in your chocolate chips and the shortening/oil. Here’s where I’ve messed up more times than I care to admit – DO NOT just throw it in for 2 minutes and walk away! You’ll end up with a burning, smoky mess. Instead, microwave in 30-second intervals, stirring between each zap. It usually takes about 1.5-2 minutes total.
Alternatively, you can use the double-boiler method if you’re feeling fancy. Just put the chocolate in a bowl over a pot of simmering water. But honestly? The microwave works just fine, and I’m all about fewer dishes to wash.
The chocolate is ready when it’s smooth and has a glossy look to it. If it seems too thick for dipping, add a tiny bit more oil. Too thin? Add a few more chocolate chips and stir until melted.
Step 4: The Dipping Process
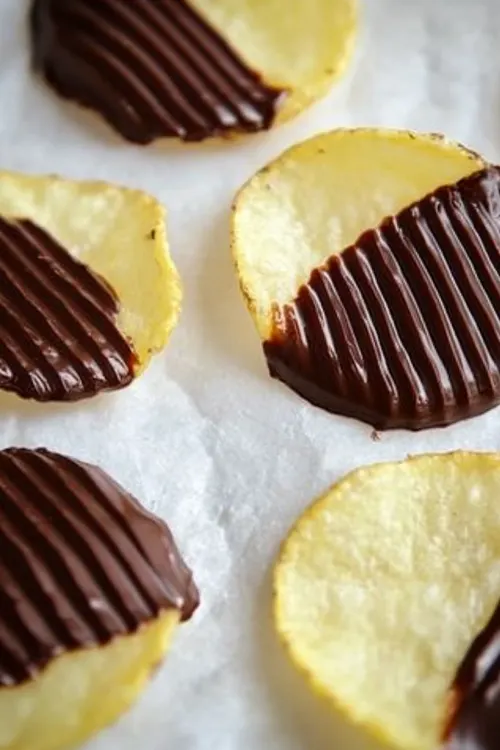
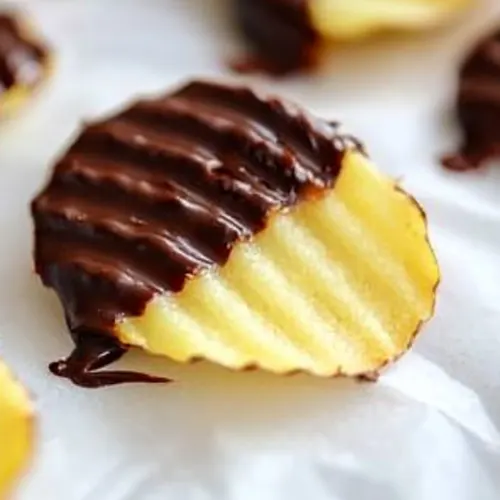
Now for the fun part! Take a chip and dip it halfway into the melted chocolate. You can go full coverage if you want, but I find that having some naked chip poking out makes them easier to hold and gives a nice visual contrast.
As you dip each chip, gently tap off any excess chocolate. I learned this the hard way – first time I made chocolate covered potato chips, I didn’t tap, and ended up with these massive chocolate blobs with a chip hiding somewhere inside!
Step 5: Add Toppings (If Using)
While the chocolate is still wet, sprinkle on any toppings you’re using. Work quickly here because the chocolate starts setting pretty fast, especially if your kitchen is cool. I’ve definitely had moments of frantically throwing sprinkles at nearly-set chocolate and watching them bounce right off. Not my proudest kitchen moment.
Step 6: Let ‘Em Set
Place your freshly dipped chocolate covered potato chips on the parchment-lined baking sheets, making sure they’re not touching each other. Now you’ve gotta let them set. If you’re patient, you can leave them on the counter for about an hour. If you’re like me and have zero patience, pop ’em in the fridge for about 10-15 minutes.
Whatever you do, DON’T put them in the freezer thinking it’ll speed things up even more. Been there, done that – the rapid temperature change makes the chocolate develop this weird condensation when you take them out. Then your beautiful chocolate covered potato get all soggy, and nobody wants a soggy chip!
Step 7: Drizzle (Optional but Fancy)
If you’re feeling extra, melt some contrasting chocolate (white if you used dark, dark if you used milk, etc.) and drizzle it over the set chips. This isn’t necessary at all, but it makes your chocolate covered potato chips look super professional with minimal effort.
Variations & Storage
So you’ve mastered the basic chocolate covered potato chips recipe – now what? Time to get creative!
My daughter’s obsessed with what we call “Birthday Cake Chips” – white chocolate covered potato chips with rainbow sprinkles. They’re ridiculously colorful and always the first to disappear at parties.
For you spicy food lovers, try adding a tiny pinch of cayenne to the chocolate before dipping. My brother-in-law introduced me to this variation last Thanksgiving, and the subtle heat with the sweet and salty is mind-blowing.
Better made chocolate covered potato chips are a Michigan thing, but you can recreate their magic by using kettle-style chips for extra crunch. Those thick, crunchy better made chocolate covered potato chips inspire me to sometimes use kettle chips instead of regular ones.
As for storage – IF there are any leftovers (big if in my house), store your chocolate covered potato chips in an airtight container. I learned this lesson when I left some out overnight on the counter covered with just a paper towel. By morning, they had absorbed all the kitchen humidity and were about as crispy as wet newspaper. So disappointing!
They’ll stay fresh at room temperature for about 3 days. You can refrigerate them to make them last longer (about a week), but personally, I think they taste better at room temp. I’ve tried freezing them once when I made a huge batch for a party, and while they were still edible after thawing, they definitely lost some of their textural magic.
Oh, and pro tip: if your chocolate covered potato chips do get a little stale, you can revive them by popping them in a 300°F oven for about 3-5 minutes. Just keep a close eye on them – the chocolate can go from “perfectly melty” to “sad puddle” real quick!
Chocolate Covered Potato Chips
Equipment
- Microwave-safe bowl
- Baking sheets
- Parchment paper
Ingredients
- 1 bag 8 oz ridged potato chips (Ruffles recommended)
- 2 cups chocolate chips semi-sweet preferred
- 1 tablespoon vegetable shortening or coconut oil
- Optional toppings: crushed nuts sea salt, sprinkles, crushed candy, etc.
Instructions
- Prep Your Workspace: Line a baking sheet with parchment paper.
- Sort Your Chips: Choose whole, unbroken chips.
- Melt the Chocolate: Microwave chocolate chips and shortening/oil in 30-second intervals until smooth.
- Dip Chips: Dip chips halfway into the melted chocolate and tap off excess.
- Add Toppings: Sprinkle toppings onto the wet chocolate.
- Let Them Set: Place chips on the parchment paper and let them set for 1 hour or chill in the fridge for 10-15 minutes.
- Drizzle (Optional): Drizzle contrasting melted chocolate over the set chips.
Notes
Nutrition
FAQ Section
How to make chips dipped in chocolate?
So the basic process is pretty simple. Melt your chocolate with a little bit of oil (helps with consistency), dip your chips halfway or fully depending on your preference, tap off excess, and then let them set on parchment paper. The key is using sturdy chips – those flimsy ones will break your heart and your chocolate bowl!
Are chocolate covered nuts a healthy snack?
Well, that’s a bit off-topic from our chocolate covered potato chips, but since you asked – they’re healthier than a lot of processed snacks! Nuts have protein and good fats, and dark chocolate has antioxidants. That said, they’re still coated in chocolate, so moderation is key. Unlike our chocolate covered potato chips, which I fully encourage you to eat without moderation because life is short and they’re delicious!
What are chocolate covered potato chips called?
Honestly, most people just call them chocolate covered potato chips or chocolate dipped potato chips. I’ve heard some fancy specialty shops call them “Choco-Tatoes” or “Chip-o-lates,” which is cute but kinda unnecessary. In my house, we just call them “those amazing things” as in “Mom, can you make those amazing things for movie night?”
Can you use chocolate chips as melting chocolate for dipping?
Absolutely! That’s what I always use. The key is adding that little bit of shortening or oil to get the right consistency. Without it, chocolate chips can get a bit too thick and clumpy. Some baking purists might insist on using specialized dipping chocolate, but seriously, good quality chocolate chips work perfectly fine for chocolate covered potato chips.
Should I add oil to chocolate chips for melting?
Yes! I touched on this earlier, but it’s worth repeating. Adding about 1 tablespoon of shortening or coconut oil per 2 cups of chocolate chips will give you that smooth, glossy finish that’s perfect for dipping. It also helps prevent that white “bloom” that sometimes appears on chocolate. Trust me on this one – I’ve made chocolate covered potato chips both ways, and the oil makes a huge difference.
Personal Conclusion
So there you have it – everything you need to know about making incredible chocolate covered potato chips at home! I made these last Fourth of July for our neighborhood block party, and they disappeared faster than my kids when it’s chore time.
What I love most about chocolate covered potato chips is how they bring people together. Even the pickiest eaters usually can’t resist trying one, and then they’re hooked! The combination of salty and sweet just hits different, you know?
If you give this recipe a try, I’d love to hear how it turned out! Did you stick with the classic chocolate covered potato chips, or did you get wild with toppings? Any happy accidents that led to delicious discoveries? Drop a comment below and let me know your chocolate covered potato chips adventure stories!
Now if you’ll excuse me, writing this has given me a serious craving, so I’m off to raid my pantry for chips and chocolate. Some research just never ends!